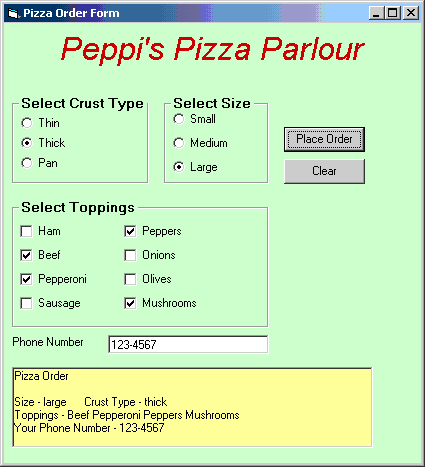
Instructions:
- This VB form illustrates the use of group boxes (grp) ,
radio buttons (rad), and check boxes (chk). Draw the form shown
above. Name the form frmPizza and set the caption as shown.
- Add a label at the top that reads "Peppi's
Pizza Parlour".
- Select the group box object from the containers tab of the toolbox and
add it to the form. Name the group box grpCrust. Set the text
to "Select Crust Type". Set the BackColor to the same color
as your form.
- Now select the radio button from the toolbox. Move the curser into the group box and draw the
radio button inside the group box. (Or alternately, double click on the radio button in the tool box and drag the radio button into the group box.)
- Name the radio button radThin.
- Set the text of the radio button to "Thin".
- Set the BackColor to the same color as the form.
- Repeat steps 4-7 for radio buttons "Thick"
and "Pan" setting the properties similarly.
- Following the same procedure as step three add another
group box to the right for the pizza size. Name this group box grpSize.
- Following steps 4-7 add radio buttons for
"Small", "Medium", and "Large" setting
the properties accordingly. Name them radSmall, radMedium and radLarge.
- Now add a group box for the Toppings. As with
step 3 select the group box object and draw it on the form.
Set the Name, Text, and BackColor properties.
- Select the check box object on the toolbox. Draw out the check box inside the group box.
Set the name of the check box to chkHam. (Or alternately, double click on the check box icon in the tool box and drag the radio button into the group box.) Set the text to "Ham"
and set the BackColor property to the same color as the form.
- Repeat step 12 adding check boxes for the
other toppings setting the properties accordingly.
- Add a button with text "Place
Order".
- Add a second button with text "Clear". Add code that will clear all check boxes when the button is clicked.
- Add a label that reads "Phone Number"
- Add a text box that will allow the customer
to type in their phone number. Set the name to txtPhone. Do not put
any text in the text box.
- Finally add a list box at the bottom. Name
the list box lstResults. Set the BackColor to yellow. NOTE:
The contents of the List box shown in the figure represent
an actual order. Leave your list box blank.
- Run the program and make sure that only one radion button from each group will be active and that you can check all the check boxes.
- Save your work as we will complete this project later.
|
